Summary: In so many situations, iTunes users complain about receiving iTunes error 53 while attempting to update iPhone. While restoring iTunes too, such an issue likely to appear. This issue is solved in the iOS 9.3 update however, several users still face it in iOS 11 and iOS 12. This post provides all the possible ways via which you can fix iTunes Error 53.
‘Yesterday, I was using iTunes and while installing iOS 12.0.1 with iTunes I got an error 53. Previously, before using the installation, everything was fine with the iPhone 6s but I am noticing that now it is stuck into restore mode. Is there any way possible to get rid of this situation?’
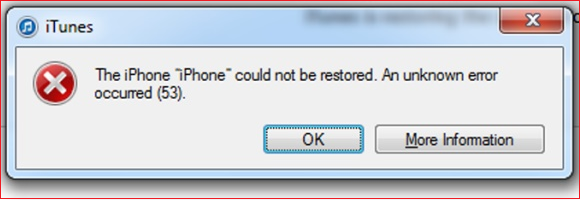
Unfortunately, it is seen that iTunes error 53 flashes on-screen while restoring the iPhone or while updating it.
After millions of users faced this scenario, Apple declared that such an issue is not possible now while doing the iOS 9.3 update, but still, several users face such an error while they use iOS 11/12.
It is difficult to make out the real cause behind iTunes error 53 but after evaluating the users’ issues it is concluded that hardware change in the device caused the problem. Besides this hardware device change, the error might have caused due to Touch ID and even the replacement of the Home button can be considered an important cause behind the issue.
Is there any possibility of solving iTunes error 53?
There is a sure solution available to overcome such a troublesome scenario. Check them below:
Ways to Fix iTunes Error 53:
- Update iTunes once again and in a different manner
- Sort out the Touch ID button issue
- Upgrade both Mac Operating System as well as your Computer
- Upgrade your iPhone iOS
- Upgrade iTunes
- Install iTunes again
- Junk Data Deletion from your PC
- Registry Cleaning from Computer
Let us find out the step-by-step process of every method to overcome the error obstacle:
The methods described here are fit to be used in any iOS edition. It is comfortable to use them on iPhone 6/6s/7/8/X/XR/XS etc.
Method 1: Update iTunes once again and in a different manner
Apple always suggests that if a user encounters an error 53 in iTunes during the time of restoration or up gradation, then there is no harm in doing so again. The steps to upgrade or restore are as follows:
- To begin the process, first, stop iTunes on your Computer
- And if your iPhone plugged in the PC, then unplug it immediately.
- After unplugging the iPhone, update your iTunes
- Now, connect iPhone to your PC only and only with the Apple USB cable
- After this, you can open iTunes and then choose the iPhone
- You will find the options to restore or to do the update the iTunes. Click on Update
- You can now try to install iOS as well as restore the iPhone.
While updating the process, there are higher chances of coming across any of the below-mentioned scenarios. To manage any such unforeseen situation, here is what you are expected to do:
Failed to find the Apple logo:
- Get done with the Force restart of the iOS device
- And click on the options such as Restore or Upgrade
If you see the Hello screen on iPhone:
In case you find the Hello screen on iPhone, execute the onscreen steps. Suppose your iPhone is already backed up, you can again set it with the help of backup.
If you see the Touch ID screen:
In the situation, where you see the Touch ID on your screen, it is better to tap the Setup Touch ID after some time rather than doing at the same time.
Method 2: Sort out the Touch ID Button Issue
It is noticed that iTunes error 53 is deeply connected to the Touch ID present on iPhone. Thus, make sure that you check whether it is functioning correctly or not. The cause behind the error may be caused because of security error.
To get rid of the problem, immediately contact the Support helpdesk and fetch the required services.
Here, it is also important to keep in mind, that replacement of the iPhone hardware device through professional repair may adversely affect the device. Contact Apple support services for help in this regard.
Method 3: Upgrade both Mac Operating System as well as your Computer
It is always advisable never to ignore the update messages. If you keep on updating from time to time, you may save the device from various unexpected situations. Along with the quick response to updates, it is equally crucial to use the latest OS as this may help in resolving the iTunes error 53.
Windows OS Users: Those who use Windows OS can update easily by using the following step:
- First, go to Control Panel and then System and Security option. Now, click Windows Update and select Install.
Mac Users: It is easy for Mac users to update by using the below-given step:
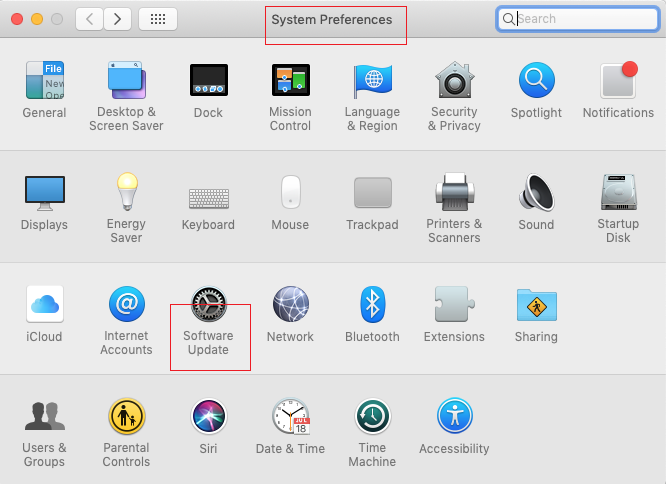
- Go to Apple icon and click it. Now, under System Preferences, choose Software Update and click the ‘Update Now’.
Method 4: Upgrade your iPhone iOS
Of course, updates form an important formality if you want everything perfect in your iPhone. Apple provides updates that consequently, remove the bugs and enhance the performance. To Upgrade the iPhone iOS, follow the simple step:
The prerequisite is to turn on the Internet on your iPhone. Now, go to ‘Settings’ and after that go to ‘General’. Then click ‘Software Update’ and soon after this, tap the ‘Download and Install’.
Method 5: Upgrade iTunes
If you are a Windows user, then open iTunes, and in the menu bar, go to Help >> Check for Updates.
If you are a Mac user then App Store is a good idea to upgrade iTunes. Go to App Store >> press Updates >> choose Install. This will in turn help you to know if any updates are available. Or else, click Apple icon >> System Preferences >> Software Update.

Method 6: Install iTunes again
Even if you have already installed iTunes, make sure to install iTunes once again. Sometimes, reinstallation help in sorting out the error 53.
Method 7: Junk Data Deletion from your PC (Mac and Windows)
Junk files are harmful and may result in conflict. In addition to this, junk files also use the extra space on the hard drive. For smooth working of iTunes, the regular cleaning of your system by removing the junk, along with temporary files and cache becomes an important requirement.
Steps for junk data removal on Windows: Here are the easy steps to clean junk on MS Windows:
- Go to the search box of Windows installed PC and type ‘disk cleanup’
- After this, choose ‘Disk Cleanup’
- Now, from drives in your PC, select the drive for which you want to conduct clean up. Next press ‘OK’

4. Make a selection of the files that you want to remove
5. After this press OK.
Steps for junk data removal on Mac: Here are the easy steps to clean junk on Mac OS:
- First, go to ‘Finder’ >> under ‘Go’ >> Select ‘Go to the Folder’ option
- Once you reach ‘Go To Folder’ type: ~/Library/Caches
- Choose the files and right-click on them. Now, select ‘Move to Trash’ so that all the files can go to this Trash.
- If you wish to empty the Trash, you can do so.
- You can repeat the steps for sending the other files to Trash. The timer will make the replacement of the Library/Caches to ~/Library/Logs for cleaning up the unused files
Method 8: Registry Cleaning from Computer
- A computer installed with Windows OS uses a registry for storing important info about applications on PC. Inapt entries will lead to cause errors and stop the Applications to work.
- If you have come across iTunes error 53 while updating iPhone, it may result in registry clean up from Computer.
- It is thus important to the computer’s registry. You can do this using a manual process or use software for registry cleaning.
- However, the manual procedure is difficult to use so not recommended if you are unsure about the process.
- Rather than choosing Registry Cleaning, you may try using CCleaner and other facilities.

