When it comes to using a common file format for MS Outlook, PST is a well-familiar format. A PST file can hold up to 50GB of the database on your system. A large PST file sometimes causes an interruption. They can impact Outlook and system performance. If you have not integrated your Outlook with Exchange Server, Outlook automatically takes PST as the file format to save data locally. If not then we will learn to import PST files to Exchange Mailbox.
Users have choices to export from Outlook PST to Exchange Mailbox. They can go with manual solutions or use a third-party conversion app. The article throws light on how to use Exchange Management Shell and Exchange Admin Center or Outlook to export PST to Exchange Server.
Import PST to Exchange Mailboxes to use PowerShell and Exchange Admin Center or Outlook
To use Exchange Admin Center and Outlook to export PST to Exchange Mailbox, you need a shared folder with the right that the Exchange Trusted Subsystem can access these files. If the requirement is to export a few PST files, you can create them on your Exchange Server. If you are using a dedicated server for mailing, you can create a PST file to share. In the advanced sharing option, don’t forget to add the Exchange Trusted Subsystem that offers complete access.
After these steps, you can copy a PST from your system. It is easy to identify the PST file because the file name of the file may be your email address. After copying the file, move it to a suitable location and the location can be the target folder in the mailbox, the archive mailbox, or the primary mailbox.
Before you import a PST file, confirm your permission in Exchange to achieve this. As the process finishes, you can now plan to import the mailbox.
Using PowerShell to Import PST Files to Exchange Mailboxes
The PowerShell import method requires technical skills. If you have basic computer skills, you can consult an expert for the PowerShell import process. Below are some PowerShell commands to follow. The first is for the desired folder.
New-MailboxImportRequest -Mailbox User1 -FilePath \\EX2016A\PSTFiles\User1.pst -TargetRootFolder “PSTImport”
The above simple command transfers the PST file from the server EX2016A and connects it to the folder of your choice.
The next command is to import the PST file to the archive mailbox:
New-MailboxImportRequest -Name “User 1 Import” -FilePath \\EX2016A\PSTFiles\User1Archive.pst -Mailbox User1 -IsArchive -IncludeFolders “#Inbox#” -TargetRootFolder “Recovered Files” -Priority High
The last command is simple as it doesn’t need a target folder. You can take the guidance of the command.
Using Exchange Admin Center and EMS
Its interface is interactive. Users find the process easy to follow.
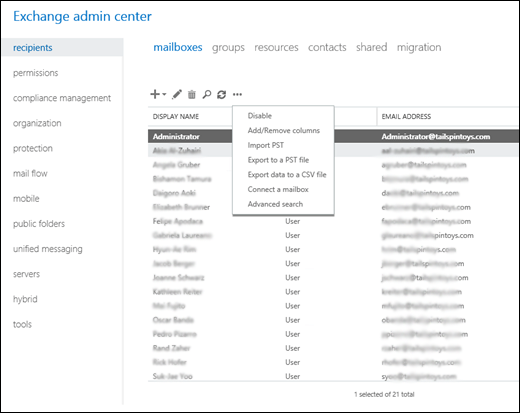
- First, open the Exchange admin center, and locate the Recipients Tab on the left side, click mailboxes on the right.

- Hit the refresh tab, press the three dots to open the menu, and hit the Import PST option.
- It will open the “Import from a PST file” window and enter the path \\EX2016A\PSTFiles\User1.pst as an example.

- Press the Next tab and choose a suitable option. The preferred one is Import to this Mailbox. Finally, hit the Finish button.

- For Exchange Management Shell and the Exchange admin center, you can take the help of PowerShell to confirm the import status.
Note:- If you have exchanged mailbox data into EDB file format and want to convert it into PST, we have another tool Exchange EDB To PST Converter, that solves your problem-related exchange EDB files to Outlook PST Conversion.
Some important examples are-
Get-MailboxImportRequest
It features the mailbox import requests such as failed, in progress or completed state.
Get-MailboxImportRequest -Status InProgress -Database MailboxDB1
The above command confirms that the import process has started for “MailboxDB1.”
Quick Solution:- In this post we explain the manual techniques that import PST files into Exchange mailbox, but these techniques are too lengthy and time consuming process. But Softaken PST to Office365/Exchange Account Importer is the one of the best solution that gives the instant results without creating any errors. Also import bulk PST/OST file into cloud without installing Outlook.
Use Outlook to Import PST to Exchange
It is pretty easy to import PST with the help of MS Outlook, but the process can handle your Outlook application. Therefore, the safe step is to use OWA for emails or keep patience till the process is over.
- Open your MS Outlook, go to the “File” menu, select Open & Export and Choose Outlook data file (.pst).

- Again select Import/Export. A new window will open where the default option is “Import from another program or file,” choose the option.

- After that, select the desired PST file, press Next, and set up the location of the selected PST file.

- You will get the option for duplicates or not importing.

- Select the Import to PST option.
Conclusion
How do you find the above methods? If it seems tough for you, we recommend you get help from experts because your PST file data is precious. So for a quick and fast working process use the Softaken PST to Office 365 importer to import PST /OST to Office 365 with a few easy steps. It comes up with a free trial pack, which allows users to convert a few PST files into Office 365 free.
