Quick Solution to Migrate Gmail, G Suite to Office 365
- Verifying the Domain
- Creating and Adding Users with Office 365
- Create a list of Gmail mailboxes for conversion
- Creating Export Endpoints with Gmail IMAP
- Exporting Mailboxes with Batch Data Creation
- Updating DNS Records to Convert Data Directly
- Migration of Gmail to Office 365 with a Third-Party Tool
Try the automated version, named Softaken IMAP to IMAP Migration tool. It allows users to export from one IMAP to the other effortlessly and with top accuracy. The program supports various IMAP email clients such as Gmail, Office 365, Yahoo, Zimbra, AOL, iCloud, etc.
It gives an assurance of 100% accurate data conversion without modifying the original structure and email components. Download Softaken tool free version to assess the key functions of the app before getting its license. It is an excellent opportunity to try before buy. Don’t miss the opportunity.
The first step needs you to verify Office 365 with the URL that you use for your Gmail Account. If you don’t have any custom domain and only using Office 365 subscription, all you need to do is to add users after creating them in Office 365.
Step-2: Creating and Adding Users with Office 365
- To create users, it is necessary to have a relevant license. Each one has to assign a mailbox to give speed to the conversion process.
- Now, access the windows of “Admin center preview,” from the dropdown, click on the arrow mark of “Users” and then “Active Users” that will open a box, click on the “More” button and then “Import Multiple Users” option.
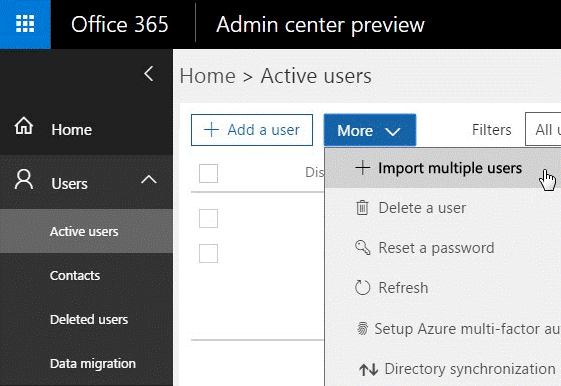
- If you are adding one user at a time, press the tab “Add a user” from the Admin Center Preview and provide the data manually. If you are using “Import Multiple Users,” you can able to add multiple users at a time by just downloading an excel sheet, containing users.
- Enter all important fields such as Username, First Name, Last Name, Age, Display Name, Age, etc.
- The “User Name” column needs the email address.
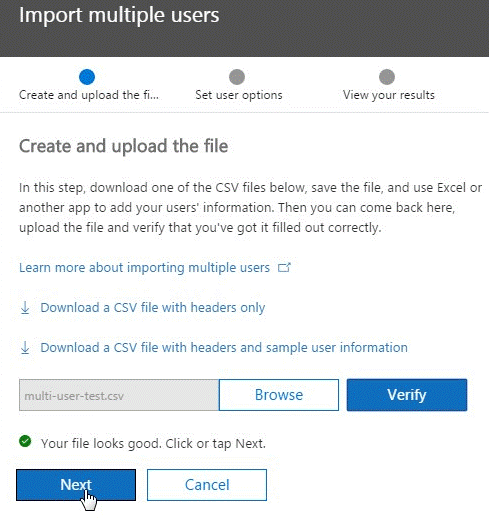
- As you integrate the Excel sheet containing the following fields, press the “Browse” button from the “Create and upload file” screen. After that press the “Verify” tab. As you get the message “File looks good,” proceed to the next step by clicking on the “Next” tab.
Step-3: Create a list of Gmail mailboxes for conversion
First, create an Excel File holding a list of Gmail mailboxes to convert into Office 365. While creating a migration file, it is necessary to know the password of each Gmail mailbox that you wish to export. You can use temporary passwords, but you must be accessible as an administrator of G Suite to reset passwords. Mailboxes can be exported in bulk with this method.
- First, sign in to your G Suite admin console by using administrator username and password.
- Select Users.
- Choose the list of users from the Google admin center.
- Select all users and write down the email address.
- Now, access the Office 365 admin center and take the cursor to Users and then Active Users.
- Open the Excel sheet. Provide the users’ credentials like email address, username, and password that you wish to export. Make sure to add one address in one row and column.
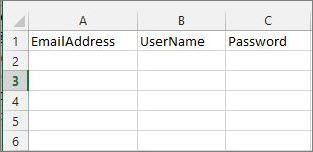
- Save the file as CSV file format.
Step-4: Creating Export Endpoints with Gmail IMAP
To smoothly convert from Gmail mailboxes to Office 365, it is necessary to create smooth communication with Gmail. For this, Office 365 supports an export endpoint. It is actually a terminology that allows you to implement to establish a connection for uninterrupted conversion of the mailboxes. Here are the steps to follow for creating a migration endpoint
- First, go to the Exchange admin center.
- After, select Recipients and then Migration and select Migration endpoints from various options.

- Now, press the New + tab
- It will open a new page, from there select IMAP.
On the IMAP conversion page, provide the details such as:
- MAP server: imap.gmail.com
- Settings: default
Now, press the Next button. If the connection is activated, it will open “Enter general information page.”
Write down the export endpoint name in the following page,
Don’t fill the remaining boxes. Press the New tab.
Step-5: Exporting Mailboxes with Batch Data Creation
Create a migration batch with Gmail mailboxes to migrate data
- For this, access the Office 365 admin center, then take the cursor to the Admin centers, and then select Exchange from the dropdown.
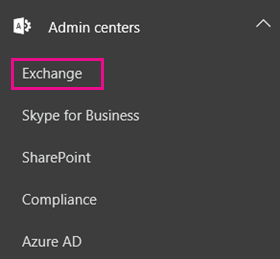
- It will open the Exchange admin center window, look for Recipients, and then hit the Migration tab.
- Press the New (+) tab and then click on the “Migrate to Exchange Online” option
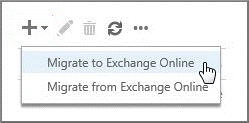
- Choose IMAP migration and press the Next tab.
- On ‘Select the users‘ screen, hit the “browse” tab, and choose the CSV file that you have created for conversion. Then, press the “Next” tab.
- After validating, Office 365 displays all selected mailboxes. Press the Next tab.
- On the “Set the migration endpoint” window, choose the conversion endpoint that you have created and hit the Next button.
- On the IMAP migration configuration wizard, press the Next tab and don’t touch any step here.
- It will open the Move configuration page, provide the name only without space of the migration batch. You can also add the folder name that you don’t want to export. Press the Add (+) icon to include them in the exclude list.
- Enter the desired options to proceed with the conversion process.
Step-6: Updating DNS Records to Convert Data Directly
Emails use a DNS record that is also known as MX record. It needs an email address for email conversion. At the time of conversion, the MX record points to the Gmail system. Now, the time has come when MX record points at Office 365. As you change your MX record Gmail mailboxes convert to Office 365 mailboxes.
- For this, go to the “Admin Center” and press the “Settings” option visible on the lift side.
- Now, hit the “Domains” tab and then choose the name of your domain. It displays “Setup in progress”.
- It will also display another notification that shows the setup is finished.
- Support, your domain name is going.com
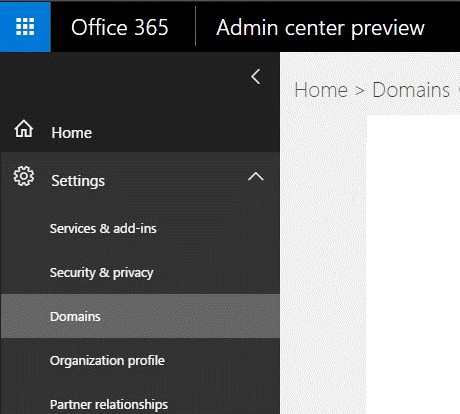
- going.com (Default) – Setup in progress
- going.onmicrosoft.com – Setup completed
Press the default going.com, it will show the “Setup your online services” screen which has two visible options-
- Add records for me – It helps to connect your DNS domain and update the MX records automatically.
- I’ll manage my own DNS records – It gives the flexibility to insert a list of DNS entries to enter your domain manually.
You will choose the second option as it allows you to add MX Records on your DNS. For each domain, the value of the MX record will be unique.
Migration of Gmail to Office 365 with a Third-Party Tool
Among various options, Softaken IMAP to IMAP Migration is one of the best applications to use. The tool offers error-free and fast IMAP to IMAP conversion. Unlike lengthy manual conversion methods, it requires just four easy steps to export data. The application is straightforward and has a user-interactive interface.
It is compatible with all IMAP server accounts including Gmail, Office 365, Yahoo, and many others. All you need to provide the host, port, user name, and password to connect one IMAP account to another. The tool exports entire folders or selected source folders. It saves the exported data to the targeted existing folder or a new folder. Make sure the internet speed is smooth and uninterrupted while exporting from one IMAP account to another. The tool pause the conversion process if the server connection goes down. You can resume the process as the connection comes back.
Here are the steps that you need to follow after downloading the program-
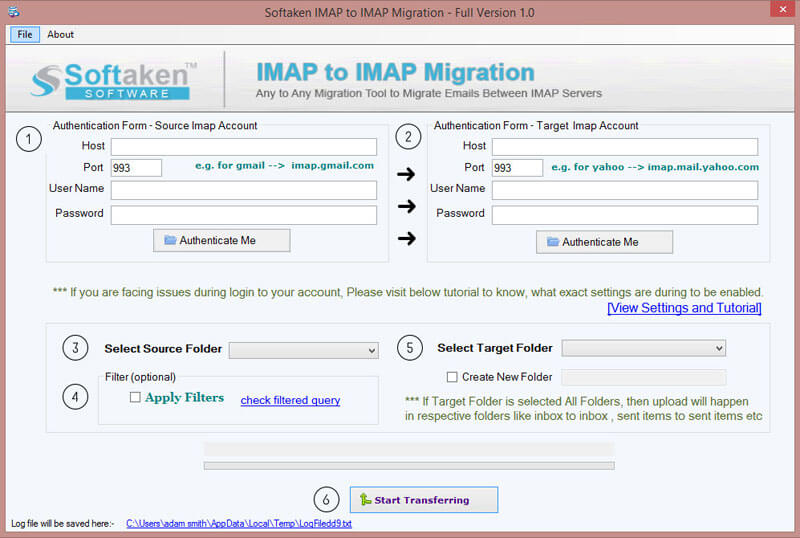
- Step 1– Open the tool. In the source IMAP account, provide the host, port, username, and password. Hit the authenticate button.
- Step 2– In the target IMAP account (right side), provide the host, the port, username, and password. Hit the Authenticate Me tab.
- Step 3– Select the source folder by clicking the arrow button.
- Step 4– Set the target folder to save the exported data. You can save data to a new folder. For this, mark the box of Create New Folder and provide a unique name to the folder.
- Step 5– Hit the “Start Transferring” button now to complete the process of data back.
Conclusion
You have two choices for conversion from Gmail to Office 365. One is manual conversion and the other is using a third-party solution. What is the best way to get the fastest conversion results? It is, of course, a third-party application.
